Guide
How much flooring do I need? Work it out from your floor plan
Measure the floor area of every room that gets the new floor, add a waste allowance for your material and layout (usually 10% for planks laid straight, 15% or more for diagonal or patterned floors), then divide by the coverage printed on the box and round up. If you have the plan as a PDF, you can take each room's area straight off it instead of measuring with a tape.
The formula
Boxes = floor area × (1 + waste %) ÷ coverage per box, rounded up to a whole box.
Floor area is what you'll actually cover: each room measured to the inside face of its walls, minus anything fixed you won't floor under, like a kitchen island or a bathtub. Coverage per box is on the carton or the product page, in ft² or m². Never round down: a box short means a second order, possibly from a different production run.
How much waste to add
Waste covers the off-cuts at the end of every row, the pieces you trim around door frames, and the odd damaged board. Manufacturers and retailers publish slightly different figures, so the table gives the range and who says what. Where your product's installation guide gives a number, use that instead.
| Material and layout | Waste to add | Published by |
|---|---|---|
| Hardwood, straight lay | 5–10% | Shaw Hardwood: 5–10% “depending on layout”; Hurst Hardwoods: 10% |
| Laminate or LVP, straight lay | 7–15% | LL Flooring: 7–10%; a rigid-core LVP installation guide: 10–15%; Ferguson: 10% “rule of thumb” |
| Any plank, diagonal | 15% | LL Flooring: 15%; Shaw Hardwood: “a higher waste percentage” |
| Herringbone, chevron and other patterns | 15–25% | LL Flooring: 15–20%; Artistic Tile, for tile herringbone: 20–25% |
| Tile, straight grid | 10–20% | Clé Tile: 10%, and “at least 15%” in its help centre; Artistic Tile: 20% |
| Tile, diagonal | 15–30% | Clé Tile: 15%, “up to 25%”; Artistic Tile: 25–30% |
| Large-format tile (18″ × 36″ and up) | 30% | Artistic Tile: “a minimum of 30% overage” |
| Carpet | 5–10% | Flooring America: 5–10% for trimming and seams, but roll width (12′, 13′-6″ or 15′) decides the real figure |
| Rooms with many corners or obstacles | +3–5% | LL Flooring, on top of the layout figure |
Sources checked November 2026. Shaw's figure is from its Solid Hardwood Installation and Care Guide; the rigid-core LVP figure is from a retailer's published installation guide. Go higher for a first DIY job, small rooms and hallways, where a larger share of each plank ends up as off-cut.
Step 1: Measure each room on the plan
Open the PDF at pdfmeasure.com and check the scale at the bottom right against the one printed in the title block. If they differ, or the plan was printed to a different paper size, see how to find the scale of a PDF plan before you go further: a wrong scale throws off every room by the same percentage.
Then make one quantity per flooring material. Press Q, name it (“LVP flooring”), set Measures to Area and click Create and start measuring. Click each inside corner of a room and double-click the last one; the area is added to the quantity and the total updates in the bar at the top. Do the same for every room that gets that floor, then use the + in the bar to start the next material.
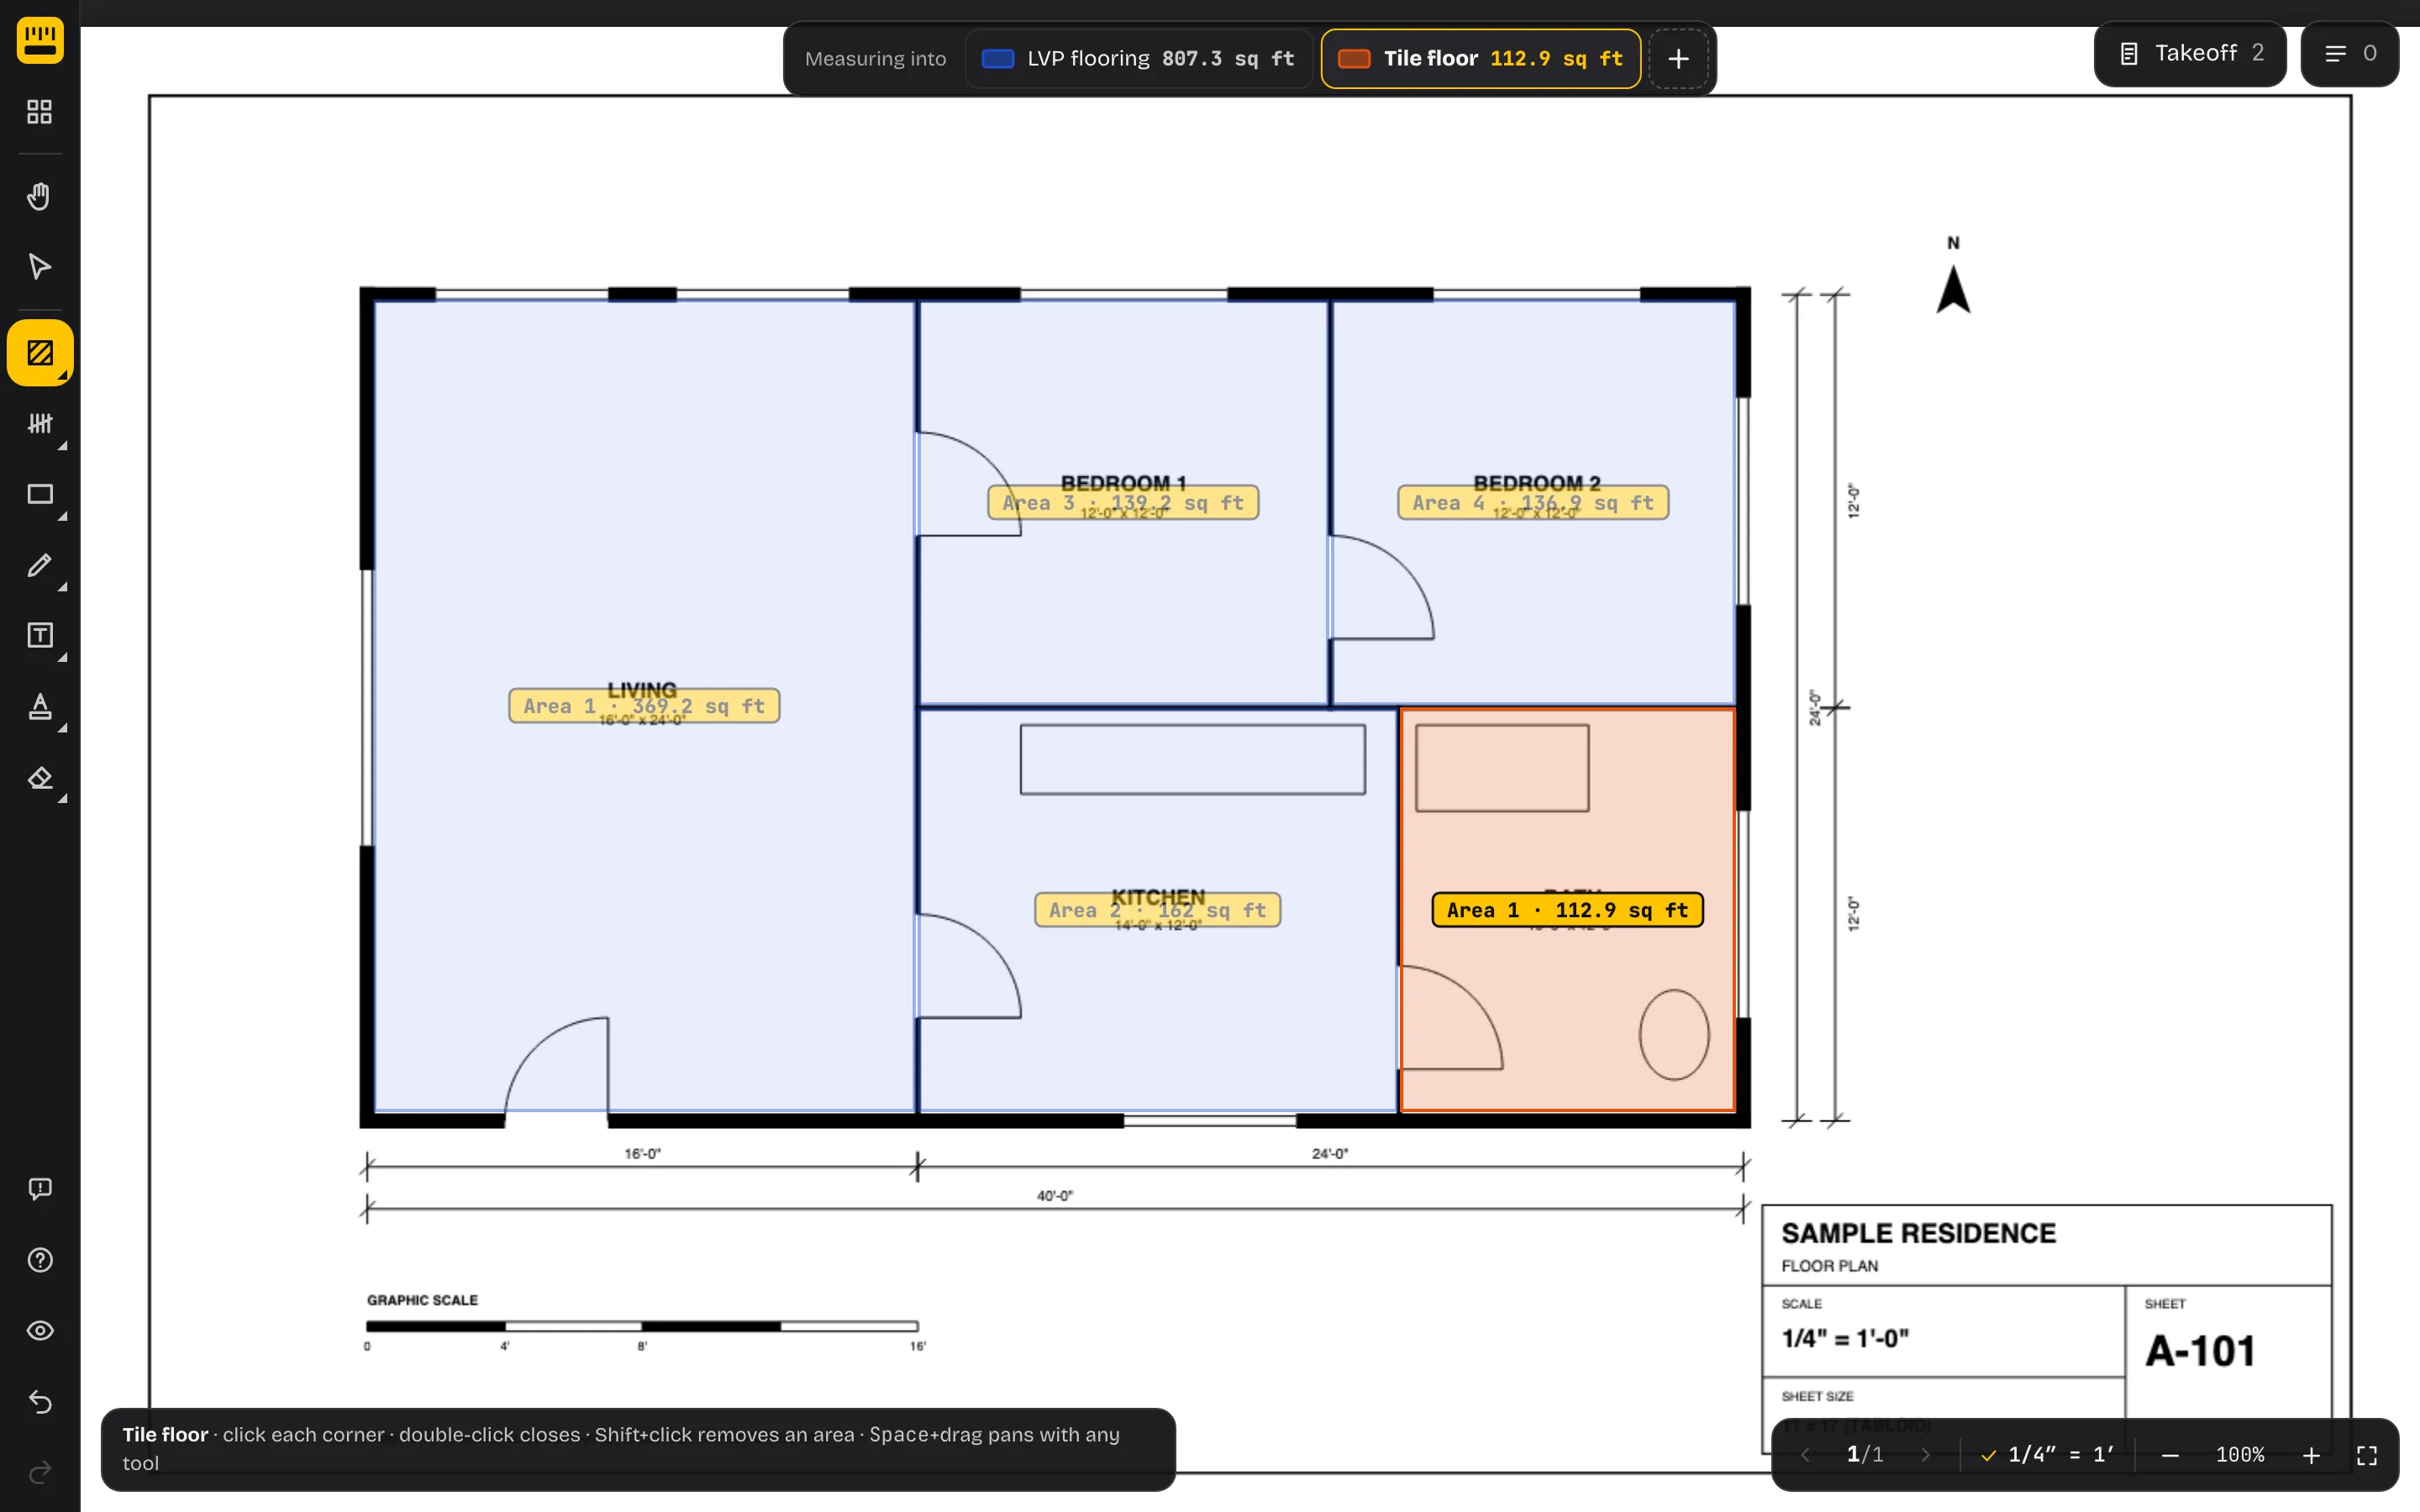
Trace to the inside face of the walls, not the centre of the wall lines or the room sizes printed on the plan. Those are often wall centre to wall centre, which counts floor that's under the walls. Our guide to measuring a PDF plan covers the Area tool in more detail, and square footage from a PDF floor plan explains gross and net area for a whole home.
Step 2: Subtract what you won't floor
Fixed islands and cabinets, tubs and shower bases usually don't get flooring under them. Floating floors in particular. One LVP maker's installation instructions put it plainly: “Do not install cabinets, islands and such on top of floating flooring.” With nail-down or glue-down floors, practice varies: some builders floor under the cabinets so they can be replaced later, others don't. Ask your installer which way your job goes.
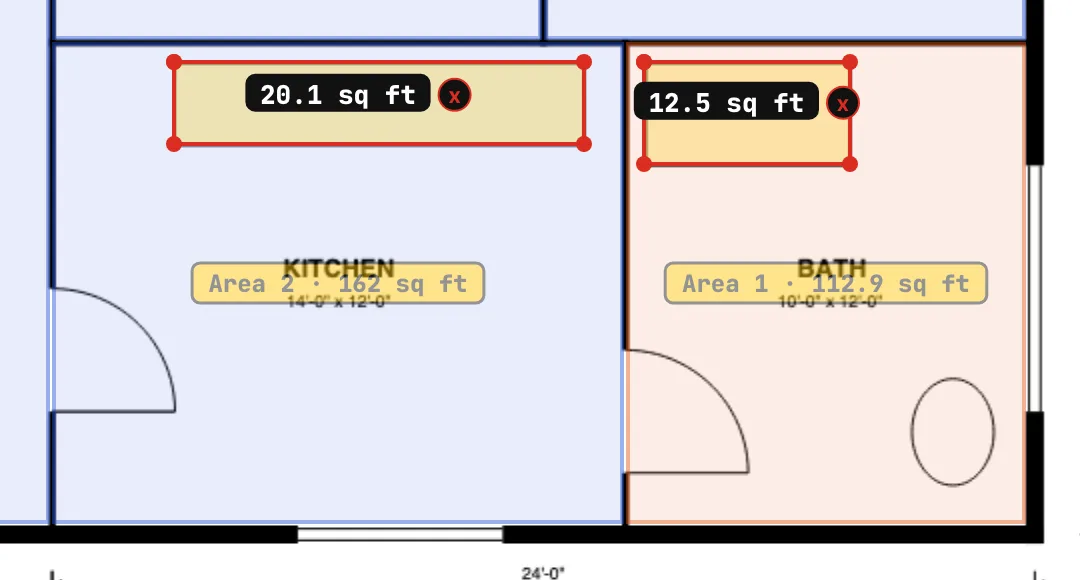
PDF Measure can't cut a hole in a traced area yet, so measure the footprints separately and subtract them. Pick the plain Area tool (S) and trace each one; they don't go into the quantity, and the inspector at the top right adds them up.
Step 3: Add waste and export
Click Takeoff at the top right. Each quantity shows what you measured, a waste percentage (10% to start, which you can change) and the order quantity with waste added. Set the waste from the table above: here, 10% for LVP laid straight and 15% for the bath tile.
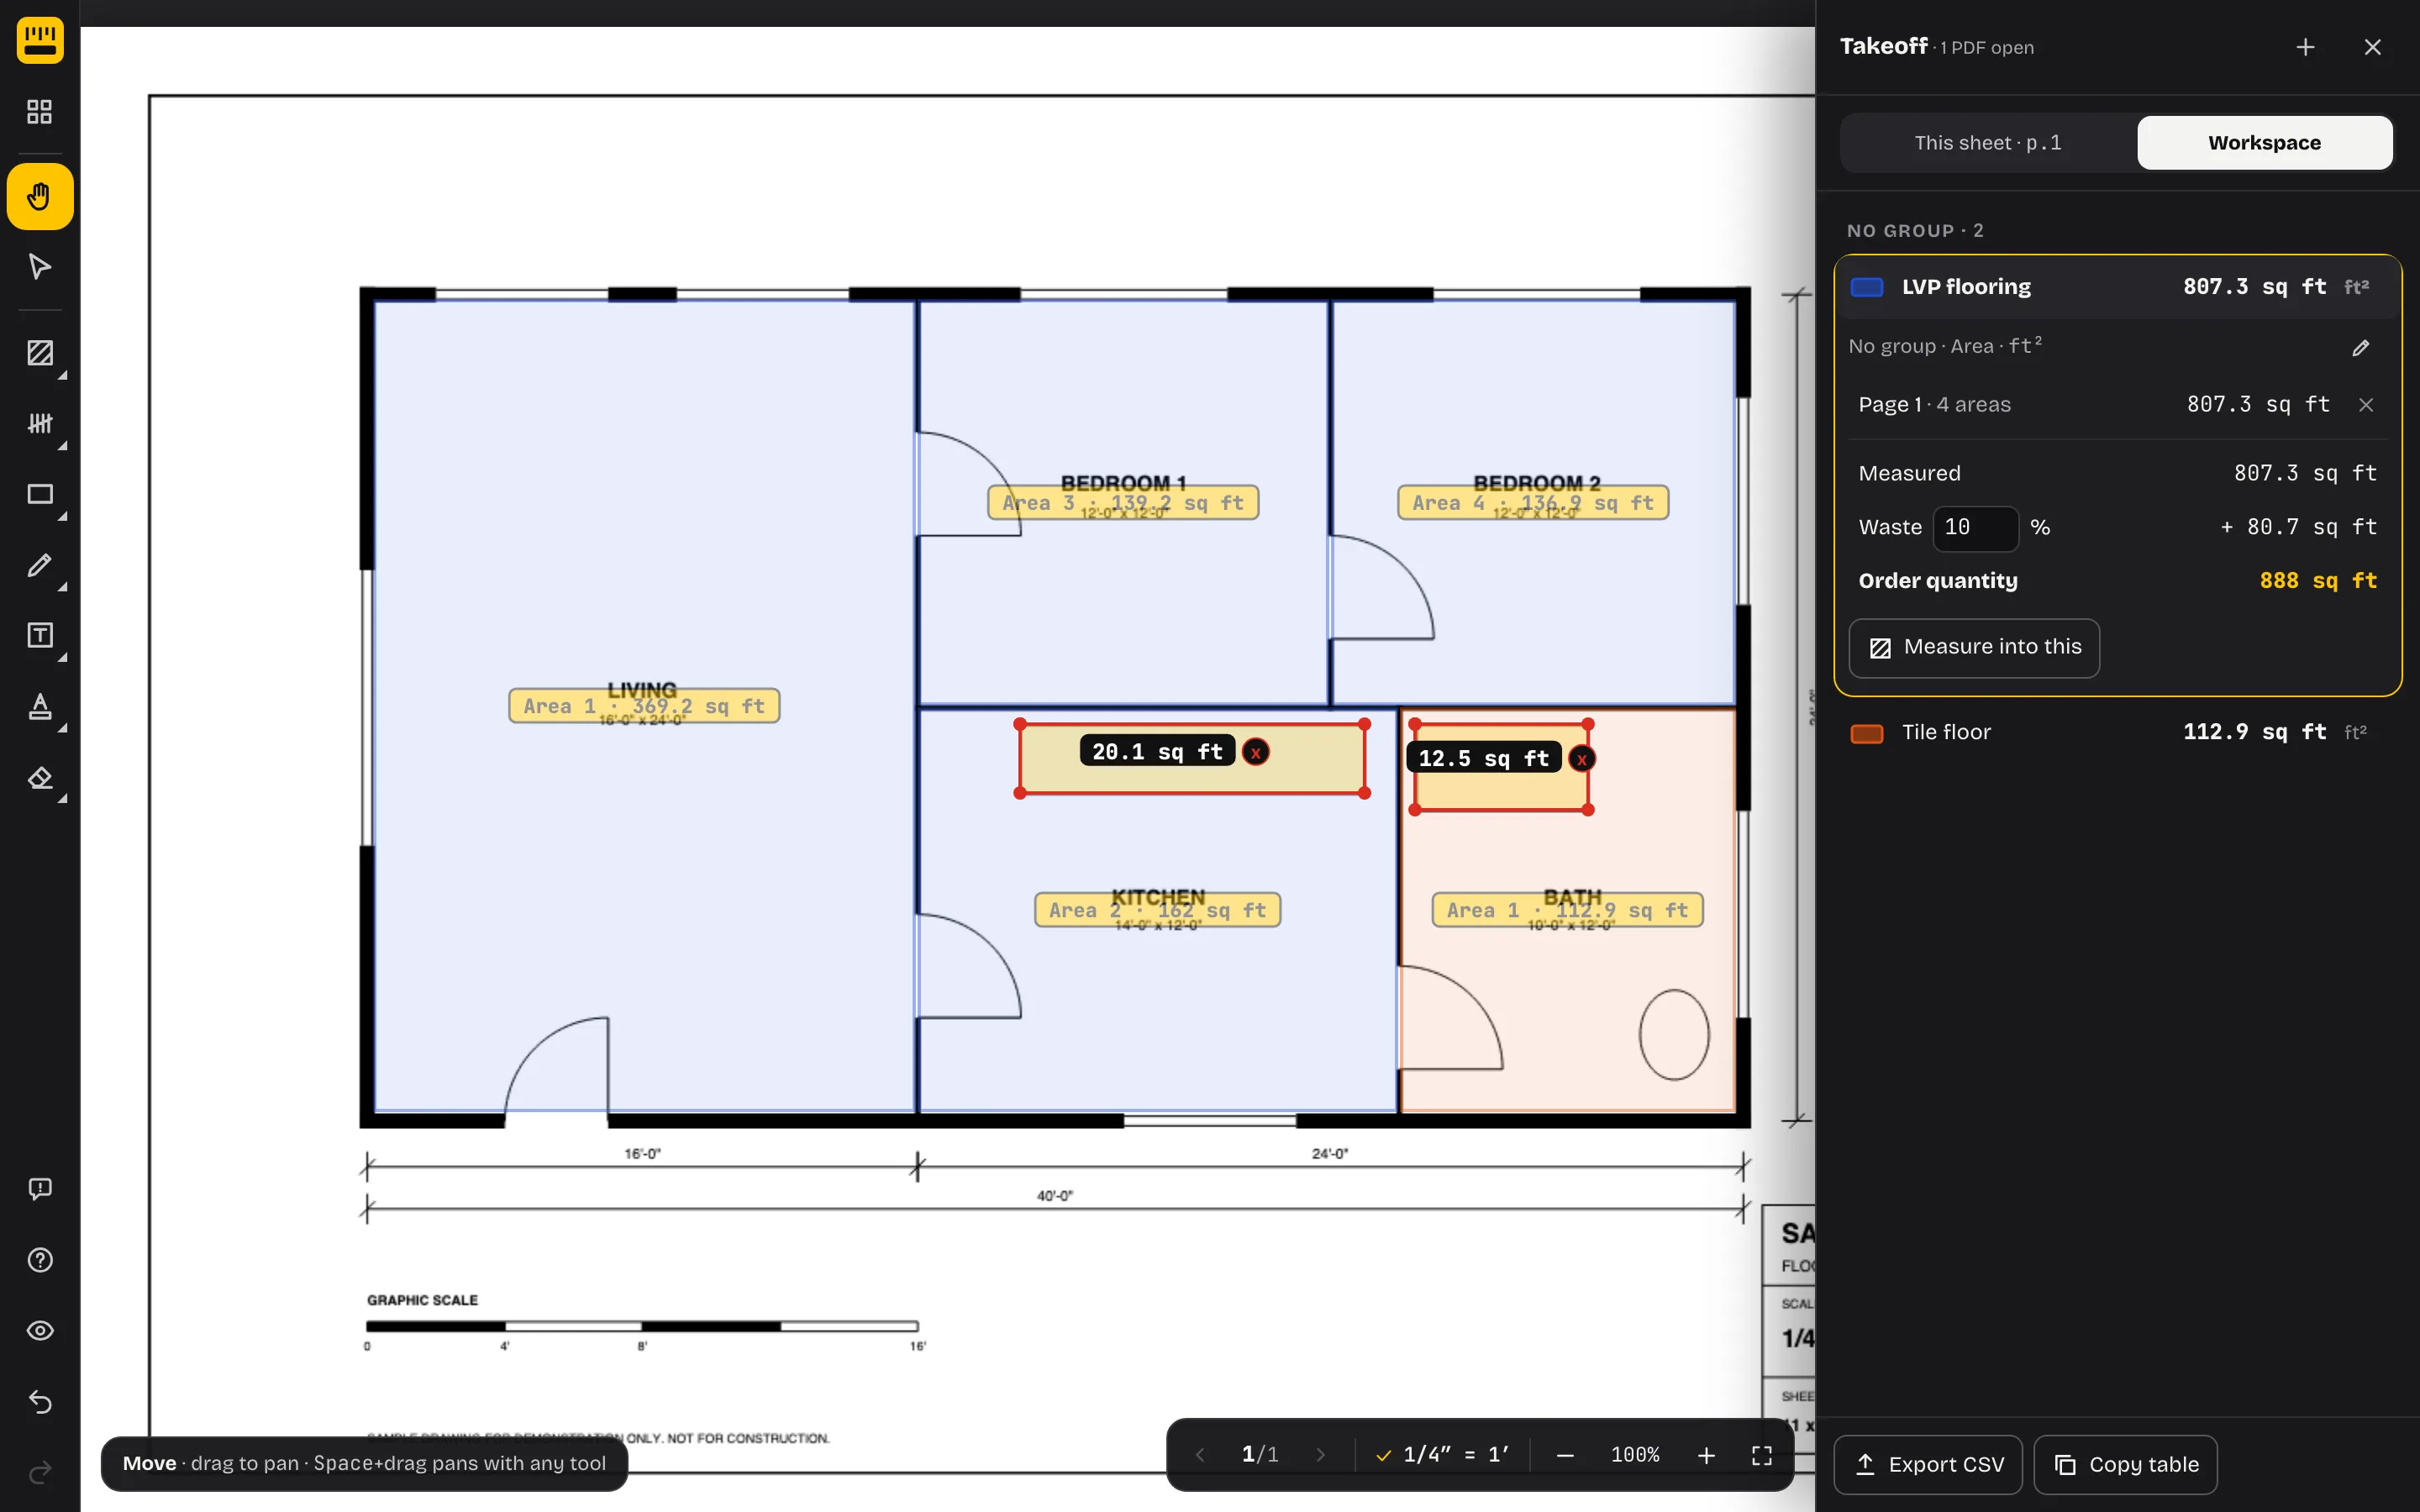
Export CSV saves the takeoff as a spreadsheet, one row per item per sheet plus a total row with the waste and order quantity. These are the rows it wrote for this plan:
| Quantity | Sheet | Detail | Measured | Waste % | Order quantity |
|---|---|---|---|---|---|
| LVP flooring | Page 1 | 4 areas | 807.26 | ||
| LVP flooring | Total | 807.26 | 10 | 887.99 | |
| Tile floor | Page 1 | 1 area | 112.93 | ||
| Tile floor | Total | 112.93 | 15 | 129.87 |
The takeoff doesn't know your box size or the deductions from Step 2, so do the last two steps in the spreadsheet, or by hand as below. If you're also pricing a takeoff for other trades, counting items and quantities on a PDF plan covers groups, several sheets and the rest of the takeoff tools.
Worked example: from the plan to boxes
The sample plan is a 40′ × 24′ house at 1/4″ = 1′-0″. LVP goes in the living room, kitchen and both bedrooms, and tile in the bath. We assumed 20 ft² per box of LVP and 16 ft² per box of tile (eight 12″ × 24″ tiles); use the figure on your own cartons.
| Room | Size on the plan | Traced, inside the walls |
|---|---|---|
| Living | 16′-0″ × 24′-0″ (384 ft²) | 369.2 ft² |
| Kitchen | 14′-0″ × 12′-0″ (168 ft²) | 162.0 ft² |
| Bedroom 1 | 12′-0″ × 12′-0″ (144 ft²) | 139.2 ft² |
| Bedroom 2 | 12′-0″ × 12′-0″ (144 ft²) | 136.9 ft² |
| Total, LVP rooms | 840 ft² | 807.3 ft² |
| Bath (tile) | 10′-0″ × 12′-0″ (120 ft²) | 112.9 ft² |
LVP: 807.3 − 20.1 (island) = 787.2 ft². Add 10%: 787.2 × 1.10 = 865.9 ft². Divide by 20: 43.3, so 44 boxes (880 ft²).
Tile: 112.9 − 12.5 (tub) = 100.4 ft². Add 15%: 100.4 × 1.15 = 115.5 ft². Divide by 16: 7.2, so 8 boxes (128 ft²).
Two things change the answer. Skip the island and the order becomes 888.0 ÷ 20 = 44.4, or 45 boxes. Work from the room sizes printed on the plan instead of tracing, and it becomes 840 × 1.10 ÷ 20 = 46.2, or 47 boxes: three boxes you'd pay for and not lay, because those sizes run to the centre of the walls.
The details people miss
- Closets. They usually get the same floor as the room they open off. Trace them into the same quantity; LL Flooring's estimating guide says to measure closets and nooks separately and add them.
- Doorways and transitions. Decide where each floor stops, usually under the door, and trace to that line. Then count the transition strips: make a Count quantity (“Transitions”) and click each doorway where two floors meet. Some click floors also need a T-molding expansion joint in long runs; one rigid-core LVP guide requires one in rooms over 40 ft in either direction.
- Room shape. Long, plain rooms waste less than rooms with jogs, bay windows or a lot of doors, because each extra corner means more cut planks. Add a few percent for the awkward rooms rather than for the whole house.
- Keep a box for repairs. Colour varies between production runs. Hurst Hardwoods suggests having “about 1 or 2 boxes left over for potential repairs in the future”, and Clé Tile warns that tile bought later “may not match your current tile”. Buy the spare with the main order and check the run or lot numbers on the cartons match.
- Baseboard. New floors often mean new baseboard. Its length is each room's perimeter minus the door openings: the Perimeter tool gives a room's perimeter, or trace the walls into a Length run named “Baseboard” and skip the doorways.
Questions people ask
Is 10% waste enough?
For planks laid parallel to the walls in ordinary rooms, usually yes; it's the most common figure retailers publish. Diagonal and patterned floors, tile, and small or awkward rooms need more. Check the table above and your product's installation guide.
Do I include closets and the area under the kitchen cabinets?
Closets, yes. Under cabinets and islands, usually not, and floating floors shouldn't go under them at all. If your installer floors under the cabinets, include them.
Should I add waste per room or to the total?
Add the base waste to the total of each material, and only add extra for the rooms that are harder to lay. Installers reuse off-cuts: on click floors, the piece cut from the end of one row can often start the next.
How many boxes for a 12 × 12 room?
144 ft² × 1.10 = 158.4 ft². At 20 ft² per box that's 7.9, so 8 boxes. If 12′ × 12′ is measured to the wall centres, the floor inside the walls is a little smaller; on our plan a 12′ × 12′ bedroom traced at 136.9 ft², which is 7.5, still 8 boxes.
Everything you trace stays in your browser: the PDF isn't uploaded, and the takeoff is still there when you reopen the plan. PDF Measure doesn't price the job or work out box counts for you; that's the spreadsheet's part.